In this article, we will learn how to use Spring @RequestBody annotation in a Spring boot application to bind method parameters to the request body.
We create a Spring Boot RESTful application to demonstrate the usage of the @RequestBody annotation.
@RequestBody annotation binds the request body to method parameters. The process of serialization/deserialization is performed by HttpMessageConverter. In addition, automatic validation can be applied by annotating the argument with @Valid.
@ResponseStatus(value = HttpStatus.OK)
@PostMapping(value="/users")
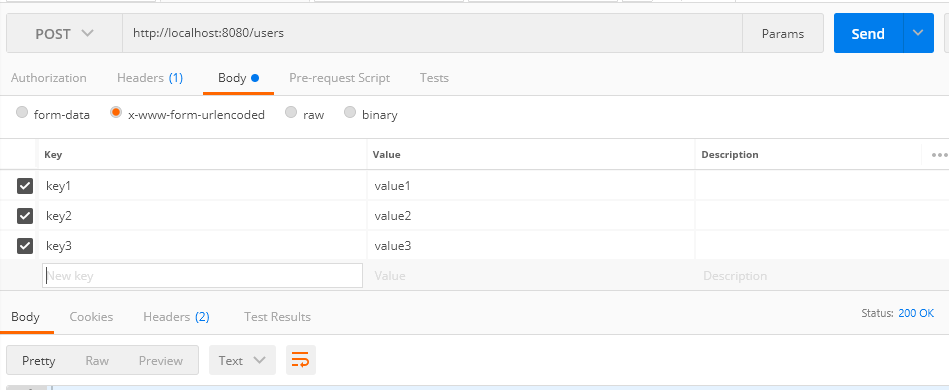
public void method(@RequestBody MultiValueMap values) {
logger.info("Values:{}", values);
}
@ResponseStatus(value = HttpStatus.OK)
@PostMapping(value="/users", consumes = MediaType.APPLICATION_JSON_VALUE)
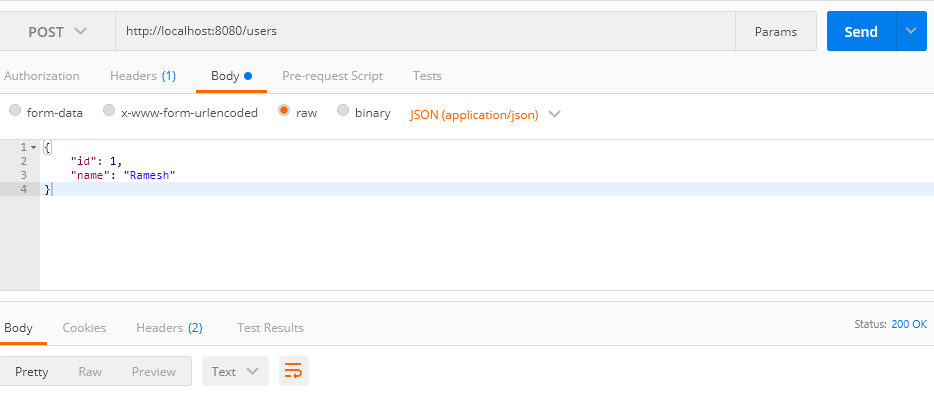
public void method1(@RequestBody User user) {
logger.info("User: {}", user);
}
The following example creates a Spring Boot web application that binds method parameters to the request body using @RequestBody annotation.
There are many ways to create a Spring Boot application. You can refer below articles to create a Spring Boot application.
>> Create Spring Boot Project With Spring Initializer
>> Create Spring Boot Project in Spring Tool Suite [STS]
Refer project structure or packaging structure in the next step.
This is the project structure of the Spring Boot application that we are going to create -

Open the pom.xml file and add the below dependency:
<dependency>
    <groupId>org.springframework.boot</groupId>
    <artifactId>spring-boot-starter-web</artifactId>
</dependency>Let's create a representation class that we use to bind to method parameters to request body:
package net.javaguides.springboot;

public class User {

    private Integer id;
    private String name;

    public User() {}

    public User(Integer id, String name) {
        this.id = id;
        this.name = name;
    }

    public Integer getId() {
        return id;
    }

    public void setId(Integer id) {
        this.id = id;
    }

    public String getName() {
        return name;
    }

    public void setName(String name) {
        this.name = name;
    }
}Let's create a simple UserController to handle the HTTP POST methods. In UserController, we have two POST mappings. We use @RequestBody to bind request parameters to MultiValueMap and User bean. The bound values are shown in logs.
package net.javaguides.springboot;

import org.slf4j.Logger;
import org.slf4j.LoggerFactory;
import org.springframework.http.HttpStatus;
import org.springframework.http.MediaType;
import org.springframework.util.MultiValueMap;
import org.springframework.web.bind.annotation.PostMapping;
import org.springframework.web.bind.annotation.RequestBody;
import org.springframework.web.bind.annotation.ResponseStatus;
import org.springframework.web.bind.annotation.RestController;

@RestController
public class UserController {

    private static final Logger logger = LoggerFactory.getLogger(UserController.class);

    @ResponseStatus(value = HttpStatus.OK)
    @PostMapping(value = "/users")
    public void method(@RequestBody MultiValueMap < String, String > values) {
        logger.info("Values:{}", values);
    }

    @ResponseStatus(value = HttpStatus.OK)
    @PostMapping(value = "/users", consumes = MediaType.APPLICATION_JSON_VALUE)
    public void method1(@RequestBody User user) {
        logger.info("User: {}", user);
    }
} Application is the entry point that sets up the Spring Boot application. The @SpringBootApplication annotation enables auto-configuration and component scanning.
Let's run this Spring boot application from either Eclipse IDE by right click -> Run As -> Java Application.
Or you can use the below maven command to run:
mvn spring-boot:run